
Photography Troubleshooting: No More Bad Photos
Running into problems when taking photographs over, and over again? Here’s a handy guide that will help you troubleshoot your problems, and improve your shots all at once!
Rather than stretch this out over several articles, it seemed like a good idea to provide solutions to common problems in Photography all in one informative list. Please be sure to ask any questions if you’re having problems not mentioned here!
Blurry Images Caused by Poor Focus
Photos that aren’t sharp are almost always caused by focus problems — either you, or the auto focus didn’t do their job correctly. If you are using auto focus and still get blurred photos it might be because the camera used another focusing point rather than the one thought you intended to use. Another reason might be the setting of the focus and then moving the camera without refocusing.
Blurry Photos Caused by Camera Shake

Camera shake is a result of unsteady hands or a too long of a exposure. To counter this you can change the shutter speed, or make the exposure time shorter. If you don’t want to change the aperture you can always change the ISO setting. Higher ISO will create noise, but noise is better than a blurry image caused by too long of a exposure time. Another option is to use a tripod or monopod.
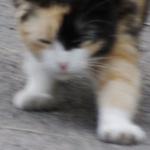
Stop Motion Blur in Photographs

This is the result of photographing a moving object with a too long exposure… no matter how steady you are. A faster shutter speed is the only solution in this problem — some action sports require speeds as quick as 1/1000+.
Too Much Contrast

The sensor is not able to pick up the whole spectrum of light and expose it correctly in some situations. Unless you want to manipulate your photographs in post-production (such as HDR) you have two options: either select the part of the scene that is most important to expose correctly, or use a graduated ND filter to get the entire scene exposed correctly (primarily used in landscape photography).
Add More Contrast

Low contrast can be a result from photographing in bad lighting conditions, or in unique instances, environments can play a role in this problem (such as a snowy landscape). This is most often easily fixed in Photoshop by using the adjustment layer Levels to change the black and white point. The example photograph is lacking contrast due to stray light reaching the sensor, which can be countered by using a lens hood.
Prevent Lens Flares

A lens flare is created when the lens picks up stray light. The best way to block out this unwanted light is to use a lens hood. Different lenses create different lens flares — cheaper lenses usually create uglier flares than high-end lenses, but even with a high-end lens one should always use a hood to minimize the risk.
Prevent Double Lights

This is an optical effect that can occur in low light situations in combination with some (often cheaper) lenses. A UV filter can increase this effect, so if you notice these types of odd lights on your night photographs you might want to consider removing the UV filter for the duration of the shoot.
Underexposure

Not enough light reached the sensor, you need to change the exposure settings to get a correctly exposed photograph. Either a slower shutter speed, a larger aperture or higher ISO — or all of them combined.
Overexposure

Too much light reached the sensor — you need to change the exposure settings to get a correctly exposed photograph. Either a faster shutter speed, a smaller aperture or lower ISO — or all of them combined.
Dark Corners — Vignette

Vignette are dark corners in a photograph, which occur when the light is not evenly distributed on the sensor or when the flash just lights up the center of a shot.
Many lenses, even high-end, create this effect when opened wide (largest aperture). To fix this problem simply stop down the aperture a few stops and this should even out the distribution.
Lens distortion

Mostly a problem when photographing architecture with a wide-angle lens. A lens below 50mm usually creates some distortion but in most cases this is not visible. However when you are photographing straight lines (such as buildings), standing close to the object and pointing the camera upwards you will more easily see these distortions. Take a few steps backward or change to a more suitable lens.
Skewed horizon

You were either holding the camera skewed or the tripod was set up uneven. Some DSLR cameras have the ability to change the focusing screen and install one that has guidelines. This is rather easily fixed in post-production by rotating the image, but you will loose some of the edges.
Red eyes
This effect occurs when the flash is located close to the lens and is a common problem with our modern point-and-shoot-cameras due to their placement of the flash. To prevent red eyes, do not use the cameras internal flash if your camera has one. Use an external flash that you can bounce on a wall or on the ceiling.Reduce Noise in Photographs

Most likely due to a high ISO setting, but can also be caused by long exposures. To prevent noise, use a low ISO setting. If you have photographs with much noise you can always use a software to remove it, such as Photoshop or Noise Ninja, though some detail will be lost of course.
Photo is yellow/orange tinted

The camera is most likely to have miscalculated and thought the photograph was outdoors and added orange tones to compensate. The white balance is the fault here, and if you’re photographing in RAW there’s no problem since you can easily just change the white balance to a desired level. If you’re not using RAW-files then you might want to check your settings in the camera — most cameras have W/B setting for indoors and outdoors, as well as custom settings and auto. The fault could also be that you used a flash that bounced off an orange surface as well, so try to always bounce the flash at a neutral surface, such as gray.
Photo is blue tinted

These photographs look very cold and are most likely due to a miscalculation by the camera and just like the previous problem discussed, you can fix it the same way. Another reason why a photograph can get a blue tint is because of large amounts of UV-light, to reduce this problem use a UV-filter that prevents the UV-light to reach the sensor without affecting the overall quality of the photograph. (Not a problem for most digital SLR cameras.)
Photo is half black

The flash doesn’t sync correctly with the camera (shutter). This problem was more predominant before the digital era, but old flashes can still cause problems with newer technology. Either buy a new flash or learn which shutter speeds work best — 1/125 and 1/60 are usually good.
Chromatic aberration

Chromatic Aberration (sometimes also called “purple fringing”) is an optical effect and it’s seen as purple edges around an object, sometimes green edges on the opposite side are also visible. This effect is most common in situations with strong contrast, such as sunlight against dark objects or black text on white background. The problem is more prominent on zoom lenses, the longer the range the worse the problem usually is. To prevent it you could use a smaller aperture — shooting with the lens wide open will enhance the problem.
Sensor Dust

These gray spots are usually caused by sensor dust. The best way to get rid of this problem is to keep your gear clean and dust free. The sensor is very sensitive and cleaning it will mean that you expose it to further risks. Some photographers send their cameras to be cleaned while others clean the sensor themselves. Choose which option you like best.
Info: Fredrik Silverglimth
0 comments:
Post a Comment